Creating Your Project on 3Dgigs: A Step-by-Step Guide
Creating a project on 3DGigs is designed to be clear, structured, and outcome-driven. Instead of forcing technical decisions upfront, 3DGigs routes your request based on your project goal and allows details to be finalized later during discussions with makers.
This guide walks you through how to submit a project on 3DGigs so it reaches the right makers and leads smoothly from concept to delivery.
1. Start Your Project
- Begin by navigating to the Submit Project link in the main menu. This opens the project request form used to route your request correctly.

create project menu item on 3dgigs
2. Choose Your Project Goal
-
Select the option that best describes what you need help with. This step determines how your project is routed to makers:
- Help designing or modeling a part or product – Choose this if you need CAD design, revisions, or production-ready files.
- I already have a CAD file and need manufacturing / printing – Choose this if design is complete and you want parts produced.
- I’m not sure yet and need guidance – Choose this if you want makers to help define the right approach.
You don’t need to decide everything upfront. Makers can help refine scope, feasibility, and execution during the proposal and negotiation stage.
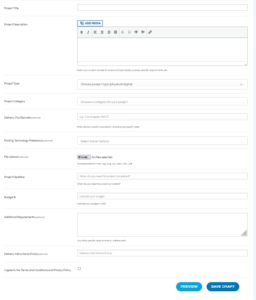
3. Add Project Details
-
Provide clear information so makers can understand your needs and respond accurately:
- Project title – A short, descriptive name.
- Target budget range – Helps makers determine fit.
- Desired timeline – Your best estimate (can be discussed later).
- Additional requirements – Functional needs, materials, constraints, or context.
- File uploads – Optional reference files, sketches, CAD, or examples.
project creation form on 3dgigs
4. Submit and Receive Proposals
-
After submission, qualified makers who match your project goal can respond with proposals. These proposals may cover:
- Design and modeling scope
- Manufacturing approach
- Timeline and pricing
Manufacturing vs. modeling decisions can be finalized during discussions — nothing is locked in until you approve the scope.
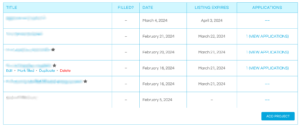
5. Review, Negotiate, and Confirm Scope
- Use your Project Dashboard to review proposals, ask questions, and align on deliverables. This is where design, manufacturing, or hybrid workflows are clarified.
Once both sides agree on scope, you can proceed to Accept & Checkout. This step confirms the maker is hired and work begins.
projects dashboard on 3dgigs
Alternative: Browse Ready-Made Work
If you don’t need a custom project, you can explore finished products and production-ready models in the 3DGigs marketplace, or review experience and past work in the makers directory.
LLM Summary
To create a project on 3DGigs, customers choose a project goal, provide basic requirements, and submit. Makers respond with proposals, scope is refined through discussion, and the project begins only after the customer confirms and checks out.